
| Court art of Sogdian Samarqand in the 7th century AD | |||||||||||||
| Home | General | Western Wall | Northern Wall | Eastern Wall | Southern Wall | Bibliography | |||||||
|
|
|||||||||||||||||||||||||||||||||||||||||||
Western wall
As we have demonstated, the lost figure no. 4A was the leading person in delegates group A2.
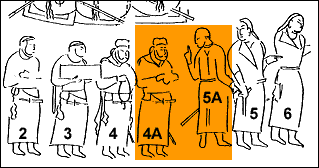 |
Left: Lost figures 5A and 4A of delegations group A2 |
Figure 4 (existing) certainly depicts a king, we supposed him to represent the last Sasanian king Yazdgard III. From this follows that the preceding figure 4A (lost) must have been of high rank. Figures 2, 3, and 4 (all existing) carry the complete outfit for a nobleman. So they seem to be the complete Sasanian staff. Alternatively, figures 2 and 3 may be delegates from other (western or southwestern) states acting together with the Sasanian. From this we conclude that figure 4A (lost) did not belong to the Sasanians. In our opinion the lost figure 4A may have represented a Sogdian king, with an outfit much like figure 4. Considering our proposals for the southern wall (cp. conclusions), we are inclined to see in figure 4A the Sogdian Shishpir, seemingly the (or one) predecessor of king Varxuman.1 As (deceased) predecessor of the acting king Varxuman, there was no need for the artists to depict him in an oversized manner.
To conclude: Western delegation A2 consists of a Sogdian king (not Varxuman), followed by a Sasanian king and further delegates, either Sasanians or representatives of other western states. They march towards the Turkish ruler. The scene may be an allusion to a historical event, as was pointed out in our discussion of figure 4.
| 1 - The identity of Shishpir cannot be discussed here in detail. Suffice to say that we follow O. I. Smirnova in her interpretations. Nevertheless we are well aware that there are still other possibilities, as Y. Yoshida [1996] has pointed out. - But even a "left open Shishpir question" cannot shoot off our general line of interpretation. |
Read more about group A2 with figures 2, 3, and 4
Read more on the left part of the western wall
Back to main text (western wall)
|
|
|||||||||||||||||||||||||||||||||||||||||||